Lab project
Create a new world using the Snow template. Place a parking meter and an ice skater in the world. Do not perform any manual operations to set the position or orientation of the ground, the parking meter, the ice skater, or the camera. However, you may perform manual operations to cause the objects in the world to be invisible at startup.
Rename the default method main.
Write the following two world-level methods, and cause these two methods to be called in sequence by the code in the main method:
- setTheStage
- playTheShow
Cause the ground, the skater, and the parking meter to be invisible when you click the Play button or the Restart button to play your world.
Assume that the blue axis belonging to the ground points due south.
In the method named setTheStage:
- Align the viewpoints of all objects with the world.
- Position the skater 2 meters due east of the parking meter in her default standing position with her feet on the ice facing the parking meter.
- Position the camera 10 meters due south of the parking meter, 1.5 meters above the ground, facing the skater.
Cause the above actions to take place as quickly as possible while the objects are invisible. Then do the following in sequential order:
- Cause the ground to become totally visible in 0 seconds.
- Cause the parking meter to become totally visible over a period of 2 seconds.
- Cause the skater to become totally visible over a period of 2 seconds.
Then terminate the method named setTheStage.
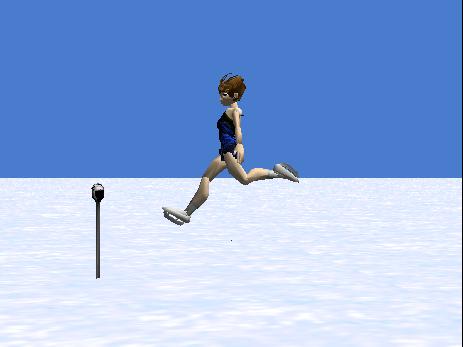
Write the code in the method named playTheShow to cause the skater to transition from her original default standing position on the ice to the pose and viewpoint shown in Figure 11 over a period of one second. Note that the skater does not move horizontally in this method. Also she does not rotate around her green axis. In other words, she is 2 meters from the parking meter facing in the general direction of the parking meter in Figure 11.
Then terminate the method named playTheShow.
The final view of your world be must as shown in Figure 11 with the skater centered horizontally in the window. When you adjust the size of your World Running... window to match the size of Figure 11, the sizes of the parking meter and the skater must be as shown and the relationships among the skater, the parking meter, and the horizon must be as shown.
Save your world in a file named Alice125LabProjA.a2w and be prepared to deliver it to your instructor in whatever manner the instructor specifies.
Make certain that your preferences are set to Java Style in Color.
Select Export Code For Printing... on the File menu and save your source code in a file named Alice125LabProjA.html. Also be prepared to deliver this file to your instructor in whatever manner the instructor specifies.
Figure 11. Required final program output for lab project A.
| |
View a movie of the lab project
You can download and play a small, low-quality movie of my version of the lab project as it being executed from the Resume button (see Downloads). This movie was designed to give you a rough idea of how your program should behave. The movie was purposely reduced in size and recorded in a low-quality format to reduce the file size and hence reduce the download time.
Because of the low quality of the movie, the execution of your program should provide much smoother animation, and should be less grainy than the movie. Also, because of the low quality of the movie, the timing in the movie doesn't necessarily match the duration times specified for the lab project.
I attempted to synchronize the beginning of the recording with the beginning of the program execution by starting, then quickly pausing, and then resuming the execution. If you watch closely, when the movie starts running, you will see the mouse pointer click the Resume button, and the movie will show one complete pass through the program.
You should view this movie in its original size. If you allow the media player to enlarge it, the quality will be poor.


